Teaching AM and PM Kindergarten – How to keep it all straight

When I began teaching kindergarten, I muddled with different ways to keep everything organized for two different classes.  (Those of you who have always taught full-day kindergarten probably can’t relate!).  The secret to my success: I colour code my classes.

I use green for my AM class and blue for my PM class, but you could use any two colours as long as they are readily available.  (I use the same system for anecdotal notes and assessments so it is important that I pick colours that paper is also stocked in at my school).

These are our bins for inside shoes. AM students put their shoes in the green bin when they go home and PM students use the blue one.

These bins are our “catch-alls” for handouts (and student work) that need to go home, again green for AM and blue for PM.

In our class we all sit together for snack.  Each student hangs their open backpack on the back of their chair and once everyone is settled, I can easily put things directly into each student’s backpack.  At our school, we often have notices for the “oldest or only” student from each family.  At the beginning of the year (until I have this list memorized),  I tie a bright yellow ribbon on each “oldest or only” child’s backpack so that I can efficiently hand out these notices.

The green and blue bins on this shelf are used for students to return their library books (our librarian likes them to stay separate by class).

What is your secret to keeping more than one class organized?  Please leave a comment and share.

Creating an environment that fosters curiosity, creativity and play

After reading, google-ing and reading some more, I decided to set up my room a little differently this year.  I wanted to create an inviting environment that fosters independence, creativity, curiosity and exploration, all through play.  After much moving and reorganizing, here is what my kindergarten classroom looks like so far:

Here is the first impression you get when you walk in our classroom door.

Another look from the door, this time looking in and to the left.  Our sensory table still needs to be filled!

This is what you see standing in the door and looking towards the door.

Our carpet time and gathering area.

Here is our dramatic play area, setup with a “kitchen” to start the year off.

This is going to be our “art centre”. I made the bench this summer with drawers to hold some of our bigger art materials like paper rolls, egg cartons, etc.

This small carpet area is for our building and construction centre.  Beside it, is our shelf of “tub toys” that we use to start each day aa well as our blue and green bins for returned library books.

Here is a look at another play area carpet and soon-to-be science area. In this picture you can also see the blue egg-chair for children who need a moment to calm down right beside our computer station (we got new computers and they have not been set-up yet).

Please leave me a comment letting me know what you think so far.  Do you have any other ideas you use to create a welcoming classroom environment?

Using “guided drawing” to develop pre-printing and printing skills

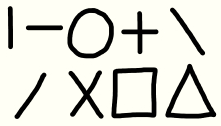
One of the things I love to do with my students to help improve their fine motor skills is “guided drawing”.  During a guided drawing mini-lesson, I show my students how to put basic shapes together to draw a picture.  Basic shape, in order of easiest to hardest, that children need to be able to draw before they are ready to print all their letters are:

OT Shapes

What better way to practice these shapes, building the skills needed for printing, than learning how to put them together to draw pictures?  After drawing a basic picture, we then extend it by discussing and adding details to make our picture even more interesting.  At the beginning of the year we spend time learning to draw different people, all with very similar starting points (head, trunk, arms, hands legs, feet, eyes and mouth).  This is how we can turn our basic person into a pirate:

Here are some tips to make your guided drawing lesson successful:

  • Use individual whiteboards with students.  Many who find drawing challenging are more willing to try if mistakes can be easily erased.
  • Before you begin, decide whether your whiteboard is “standing” or “sleeping” and make sure students hold theirs the same way.  This will make it easier for them to copy your drawing and will also help them learn how to effectively use their page.
  • Remember, it is a mini-lesson!  Keep it short; 5 minutes is more than enough time to draw a pirate.
  • Develop a routing from day 1 for handing out and collecting student whiteboards.  We have a bin for whiteboards and another with mittens stuffed with dry-erase markers.  When students are called, they come get a whiteboard and a mitten.
  • Draw pictures, one element at a time, giving students the opportunity to copy after each step.
  • Adding details provides an authentic opportunity to develop language and learn new vocabulary, esspecially in a second language classroom.  In the pirate example given, vocabulary such as patch, peg-leg, map, treasure, scruff, shovel, palm tree, etc. are just some examples of the rich vocabulary that would have been discussed during this mini-lesson.
  • Revisit pictures that you have already practiced on a different day.  This gives students some familiarity and allows them to better predict what shape may be drawn next.  However, the next time you draw a pirate, for example, you could mix it up by adding a cutlass, telescope, pirate ship or hat, just to name a few new possibilities.
  • At the end of a guided drawing lesson, I will sometimes practice printing a letter or number, just a few times.  If you decide to do this, start with the simplest letters to draw (ex. L and T) rather than going in alphabetical order.  See Handwriting Without Tears for more information on my favourite way to teach printing.

Here is an example to show how some kindergarten students’ drawings turned out during a guided drawing lesson.  This time we were drawing giraffes.

I hope you enjoy trying this with your students!  If you do and are interested in more, check out some of my other guided drawing resources here:

Halloween English Halloween FrenchFairy Tales EnglishFairy Tales FR 

What did I learn today? – Set of Mini-Posters

Here is set of mini-posters I created this past year to help parents understand why we make so much time to play in our classroom.  They link kindergarten outcomes (from the Alberta curriculum) with different centres we have in our classroom.  I posted it just outside our room to help parents understand how play is children’s work.

Mme Melissa

Play in my Classroom

Why play in the kindergarten classroom (or any classroom), you ask?  Well, put simply, I regularly see how play captivates my students and stimulates language learning and growth (for examples of kindergarten outcomes evident during play, click here).  I have witnessed, first hand, a cardboard box in my dramatic play area become a pirate ship and my ELL students transform into the captain and crew.  As they “hoist the Jolly-Roger” and to “set sail on the seven seas” in search of their treasure, their interest in learning the desired language to enact their story is apparent.  It only takes hearing “Arrrr” “Land ahoy!” or “Shiver me timbers!” once before it has become part of the common language used regularly while playing in our classroom.

But can play be more than that?  At a recent PD session where we watched a video from the Galileo Network’s Website and looked at Stuart Brown’s seven patterns of play, I began to reflect on the the play that happens daily in my classroom and how it could help develop an even deeper understandings of the world around us.  I began to look not only at the materials that are readily available but also how the classroom environment could foster certain types of play, curiosity and exploration.  I became intrigued by the Reggio Emilia Approach and giving my classroom more of a “Reggio” feeling.  And that, my friends, is where my classroom remodel, begins.  Stay-tuned for the big reveal.

My classroom before I begin to set it up. You can see that after emptying most of it for summer cleanning, it really is a blank slate.

Another before picture, this time of the back of my room.

Mme Melissa